Tech Blog made for code
Go语言练习 - Method(续)
练习:rot13Reader
编写一个实现了 io.Reader 并从另一个 io.Reader 中读取数据的 rot13Reader,通过应用 rot13 代换密码对数据流进行修改。
rot13Reader 类型已经提供。实现 Read 方法以满足 io.Reader。
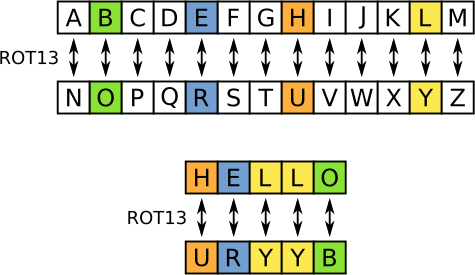
rot13是一种弱加密方法,将26个英文字母中的前13个和后13个按顺序对换。

题目给出的代码为
package main

import (
	"io"
	"os"
	"strings"
)

type rot13Reader struct {
	r io.Reader
}

func main() {
	s := strings.NewReader("Lbh penpxrq gur pbqr!")
	r := rot13Reader{s}
	io.Copy(os.Stdout, &r)
}
我们需要做的是编写rot13函数,并为rot13Reader类型实现 Read 方法。因此我们向程序添加以下代码
// 将得到的字母用rot13方法转换
func rot13(b byte) byte {
	switch {
	case 'A' <= b && b <= 'M':
		b += 13
	case 'a' <= b && b <= 'm':
		b += 13
	case 'N' <= b && b <= 'Z':
		b -= 13
	case 'n' <= b && b <= 'z':
		b -= 13
	}
	return b
}

// 重写Read方法
func (r rot13Reader) Read(p []byte) (n int, err error) {
	n, err = r.r.Read(p)
	for i := range p {
		p[i] = rot13(p[i])
	}
	return
}
运行完整的程序,可以看到程序将我们输入的乱码"Lbh penpxrq gur pbqr!"翻译为
You cracked the code!
Yeah~ Wow!
练习:图像
还记得之前编写的图片生成器吗?我们再来编写另外一个,不过这次它将会返回一个 image.Image 的实现而非一个数据切片。 定义你自己的 Image 类型,实现必要的方法并调用 pic.ShowImage。
Bounds 应当返回一个 image.Rectangle ,例如 image.Rect(0, 0, w, h)。
ColorModel 应当返回 color.RGBAModel。
At 应当返回一个颜色。上一个图片生成器的值 v 对应于此次的 color.RGBA{v, v, 255, 255}。
这里必要的方法是本题的关键信息。点进去可以看到官方对type Image所需方法的介绍
type Image interface {
    // ColorModel returns the Image's color model.
    ColorModel() color.Model
    // Bounds returns the domain for which At can return non-zero color.
    // The bounds do not necessarily contain the point (0, 0).
    Bounds() Rectangle
    // At returns the color of the pixel at (x, y).
    // At(Bounds().Min.X, Bounds().Min.Y) returns the upper-left pixel of the grid.
    // At(Bounds().Max.X-1, Bounds().Max.Y-1) returns the lower-right one.
    At(x, y int) color.Color
}
可以看到要满足Image的接口,需要有ColorModel,Bounds和At方法。我们需要根据题目要求向程序添加上面的三个方法。解答如下:
package main

import (
	"image"
	"image/color"

	"golang.org/x/tour/pic"
)

type Image struct{}

//ColorModel 应当返回 color.RGBAModel
func (i Image) ColorModel() color.Model {
	return color.RGBAModel
}

//Bounds 应当返回一个 image.Rectangle ,例如 image.Rect(0, 0, w, h)
func (i Image) Bounds() image.Rectangle {
	return image.Rect(0, 0, 255, 255)
}

//At 应当返回一个颜色。
//上一个图片生成器的值 v 对应于此次的 color.RGBA{v, v, 255, 255}
func (i Image) At(x, y int) color.Color {
	v := uint8((x + y) / 2) //运用了和上次一样的函数
	return color.RGBA{v, v, 255, 255}
}

func main() {
	m := Image{}
	pic.ShowImage(m)
}
写完后我们点击格式化(Format),程序就可以自动引入所需要的包,并且帮我们规范程序代码,使每个人的程序都非常规范!运行,我们就会得到和上次一样的图像

以上就是Go语言方法和接口部分的练习。Go Tour的所有练习代码都可以在我的Github Repo Go-tour-solutions中找到。
方法和接口可以帮我们为不同类型的结构体进行规范化处理,所以说 “ease of programming”, 即”简单快乐的开发高性能程序。” 我们可以通过以下例子来感受方法和接口
package main

import (
	"fmt"
	"math"
)

type circle struct {
	r float64
}

type square struct {
	l float64
	w float64
}

type tri struct {
	l float64
}

func (a circle) area() float64 {
	return math.Pi * a.r * a.r
}

func (a square) area() float64 {
	return a.l * a.w
}

func (a tri) area() float64 {
	return a.l * a.l * math.Sqrt(3) * 1 / 4
}

type shape interface {
	area() float64
}

func calarea(s shape) {
	fmt.Println(s.area())
}

func main() {
	c := circle{3.8}
	s := square{6, 8}
	t := tri{9.6}
	fmt.Printf("----\nFor circle with radius of %v, the area should be: \n", c.r)
	calarea(c)
	fmt.Printf("----\nFor square with height of %v and width of %v, the area should be: \n", s.l, s.w)
	calarea(s)
	fmt.Printf("----\nFor triangle with equal side length of %v, the area should be: \n", t.l)
	calarea(t)
}
我们在主程序中分别输入了圆的半径,长方形边长和正三角形的边长。
  c := circle{3.8}
  s := square{6, 8}
  t := tri{9.6}
对于不同的结构体circle, square, tri我们定义了不同的方法来计算面积,通过名为shape的接口统一起来,并用统一的calarea函数来给出不同形状的图形面积。
type shape interface {
	area() float64
}

func calarea(s shape) {
	fmt.Println(s.area())
}
运行可以得到结果
----
For circle with radius of 3.8, the area should be:
45.36459791783661
----
For square with height of 6 and width of 8, the area should be:
48
----
For triangle with equal side length of 9.6, the area should be:
39.906450606386926