Tech Blog made for code
用Go语言创建一个简易的区块链

Go语言作为新一代的编程语言,其天生支持多线程高并发的特点使其能够充分发挥多核处理器的性能。
Go is an open source programming language that makes it easy to build simple, reliable, and efficient software.
Go语言用来创造简单,可靠,高效的程序。因此Google在创立Go语言的初衷就给Go语言定义为:“简单快乐的开发高性能程序。”
随着以太坊和智能合约的兴起,大家开始关注比特币和以太币的底层 — 区块链技术。区块链本质上来说是一个公开的分布式数据库,每个使用它的人都有一个完整或部分的副本,但只有经过其他数据库管理员的同意,才能向区块中添加新的记录。每个区块存储的信息链接起来,才形成我们所熟知的区块链。 而区块链系统开发涉及到算力及应用,现有的C++,Java,Python等开发语言不是成本过高,就是性能较弱。所以在开发区块链技术的时候,多数企业会选择开发成本低并且开发性能客观的Go语言作为首选。
现在就让我们用Go语言创建一个简易的区块链网络。
本文参考Building A Simple Blockchain with Go, 对部分内容进行翻译并加入了自己的理解。 最终完成后的代码可以在我的Github Repo中找到
在本文中,我们将创建一个图书管理的区块链系统,我们的区块链将存储每本图书的借阅信息。程序的主要功能如下:
- 添加一本新书
- 创建书的创始块
- 将借阅信息添加到区块链
有了这些信息,我们可以开始code了。
Blocks 区块
在区块链中,区块存储有价值的信息。该信息可以是实现区块链的系统所需的事务或一些其他信息 — 例如,时间戳或来自先前块的哈希值。 我们现在将会为每个区块定义数据模型,以及构成我们区块链的信息
// Block contains data that will be written to the blockchain.
type Block struct {
  Pos       int
  Data      BookCheckout
  Timestamp string
  Hash      string
  PrevHash  string
}

// BookCheckout contains data for a checked out book
type BookCheckout struct {
  BookID       string `json:"book_id"`
  User         string `json:"user"`
  CheckoutDate string `json:"checkout_date"`
  IsGenesis    bool   `json:"is_genesis"`
}

// Book contains data for a sample book
type Book struct {
  ID          string `json:"id"`
  Title       string `json:"title"`
  Author      string `json:"author"`
  PublishDate string `json:"publish_date"`
  ISBN        string `json:"isbn:`
}
在Block结构中,Pos用于保存数据在链中的位置。Data是区块中需要保存的有价值信息(在这种情况下是借阅信息)。Timestamp保存区块创建时的时间。Hash保存区块生成的哈希值 。PrevHash存储前一个块的哈希值。
在定义了Block结构的情况下,我们需要考虑对块进行哈希计算以用来正确的识别区块并保证块的排序。计算哈希值是区块链的一个非常重要的部分,并且哈希值在计算上是一项非常困难的操作(这就是为什么人们会购买GPU来挖比特币)。这是一个有意为之的架构设计,它使得加入新的区块十分困难,从而保证区块一旦被加入就很难再进行修改。
Hashing and Generating Blocks 哈希计算和区块生成
下面我们为Block结构写一个哈希方法来连接区块并生成一个SHA-256的值
func (b *Block) generateHash() {
  // get string val of the Data
  bytes, _ := json.Marshal(b.Data)
  // concatenate the dataset
  data := string(b.Pos) + b.Timestamp + string(bytes) + b.PrevHash
  hash := sha256.New()
  hash.Write([]byte(data))
  b.Hash = hex.EncodeToString(hash.Sum(nil))
}
现在我们需要另一个函数CreateBlock来创建新的区块
func CreateBlock(prevBlock *Block, checkoutItem BookCheckout) *Block {
  block := &Block{}
  block.Pos = prevBlock.Pos + 1
  block.Timestamp = time.Now().String()
  block.Data = checkoutItem
  block.PrevHash = prevBlock.Hash
  block.generateHash()

  return block
}
正如函数上写的,CreateBlock函数需要传入两个参数:上一个区块和需要添加的借阅信息项。且为了保证程序的简单,我们没有对传入的参数进行检查。
Creating the Blockchain 创建区块链
我们已经为区块定义了结构,并写了一个创建区块的函数。 下面我们将定义区块链,即保存这些区块的列表,以及一个将区块添加到区块链的AddBlock方法。
// Blockchain is an ordered list of blocks
type Blockchain struct {
  blocks []*Block
}

// BlockChain is a global variable that'll return the mutated Blockchain struct
var BlockChain *Blockchain

// AddBlock adds a Block to a Blockchain
func (bc *Blockchain) AddBlock (data BookCheckout) {
  // get previous block
  prevBlock := bc.blocks[len(bc.blocks)-1]
  // create new block
  block := CreateBlock(prevBlock, data)
  bc.blocks = append(bc.blocks, block)
}
The Genesis Block 创始块
在区块链中,创始块(或创世块)是链上的首块。每次添加新块时,我们必须首先检查现在是否存在一个区块,如果没有,则添加创始块。下面我们编写一个函数来创建一个新的创始块。
func GenesisBlock() *Block {
  return CreateBlock(&Block{}, BookCheckout{IsGenesis: true})
}
我们再写一个创建区块链的函数
func NewBlockchain() *Blockchain {
  return &Blockchain{[]*Block{GenesisBlock()}}
}
NewBlockchain函数将返回一个带有创始块的Blockchain结构。为了简单我们没有引入数据库来保存我们的信息,所以每次运行时程序都会重新生成创始块。
Validation 验证
在运行我们的区块链程序之前,我们需要以某种方式实现验证功能,以便在区块发生变异或错误后不保存块。我们将创建一个辅助函数validBlock,并在Blockchain结构中的AddBlock方法里使用:
func validBlock(block, prevBlock *Block) bool {
  // Confirm the hashes
  if prevBlock.Hash != block.PrevHash {
    return false
  }
  // confirm the block's hash is valid
  if !block.validateHash(block.Hash) {
    return false
  }
  // Check the position to confirm its been incremented
  if prevBlock.Pos+1 != block.Pos {
    return false
  }
  return true
}

func (b *Block) validateHash(hash string) bool {
  b.generateHash()
  if b.Hash != hash {
    return false
  }
  return true
}
有了验证函数之后需要对前面的AddBlock方法进行修改,在区块append时加入验证机制:
// AddBlock adds a Block to a Blockchain
func (bc *Blockchain) AddBlock (data BookCheckout) {
  // get previous block
  prevBlock := bc.blocks[len(bc.blocks)-1]
  // create new block
  block := CreateBlock(prevBlock, data)
  // validate integrity of blocks
  if validBlock(block, prevBlock) {
    bc.blocks = append(bc.blocks, block)
  }
}
目前为止,我们已经完成了区块链的主要部分。现在需要创建一个web服务器,以便我们和区块链进行通信并进行测试。这里将会使用Gorilla Mux插件来注册和创建web服务器,所以在第一次运行时我们需要先下载Gorilla Mux,否则编译也无法通过。指令为
go get -u github.com/gorilla/mux
在我们的主函数func main中,编写创建web服务器所需的代码,并注册与区块链方法通信的路由。
func main() {
  // register router
  r := mux.NewRouter()
  r.HandleFunc("/", getBlockchain).Methods("GET")
  r.HandleFunc("/", writeBlock).Methods("POST")
  r.HandleFunc("/new", newBook).Methods("POST")

  log.Println("Listening on port 3000")

  log.Fatal(http.ListenAndServe(":3000", r))
}
在主函数中,我们定义了一个路由和三个线程(route)和三个处理程序(HandleFunc)。 我们现在来创建这些处理程序。
getBlockchain Handler 会将区块链作为JSON字符串写回浏览器:
func getBlockchain(w http.ResponseWriter, r *http.Request) {
  jbytes, err := json.MarshalIndent(BlockChain.blocks, "", " ")
  if err != nil {
    w.WriteHeader(http.StatusInternalServerError)
    json.NewEncoder(w).Encode(err)
    return
  }
  // write JSON string
  io.WriteString(w, string(jbytes))
}
writeBlock handler 会根据发送的信息添加一个新区块
func writeBlock(w http.ResponseWriter, r *http.Request) {
  var checkoutItem BookCheckout
  if err := json.NewDecoder(r.Body).Decode(&checkoutItem); err != nil {
    w.WriteHeader(http.StatusInternalServerError)
    log.Printf("could not write Block: %v", err)
    w.Write([]byte("could not write block"))
    return
  }
  // create block
  BlockChain.AddBlock(checkoutItem)
  resp, err := json.MarshalIndent(checkoutItem, "", " ")
  if err != nil {
    w.WriteHeader(http.StatusInternalServerError)
    log.Printf("could not marshal payload: %v", err)
    w.Write([]byte("could not write block"))
    return
  }
  w.WriteHeader(http.StatusOK)
  w.Write(resp)
}
最后一个handler newBook 会创建新的Book数据,因此我们将使用生成的ID作为区块来添加。
func newBook(w http.ResponseWriter, r *http.Request) {
  var book Book
  if err := json.NewDecoder(r.Body).Decode(&book); err != nil {
    w.WriteHeader(http.StatusInternalServerError)
    log.Printf("could not create: %v", err)
    w.Write([]byte("could not create new Book"))
    return
  }
  // We'll create an ID, concatenating the ISDBand publish date
  // This isn't an efficient way but it serves for this tutorial
  h := md5.New()
  io.WriteString(h, book.ISBN+book.PublishDate)
  book.ID = fmt.Sprintf("%x", h.Sum(nil))

  // send back payload
  resp, err := json.MarshalIndent(book, "", " ")
  if err != nil {
    w.WriteHeader(http.StatusInternalServerError)
    log.Printf("could not marshal payload: %v", err)
    w.Write([]byte("could not save book data"))
    return
  }
  w.WriteHeader(http.StatusOK)
  w.Write(resp)
}
现在我们需要修改并完善主函数func main
func main() {
  // initialize the blockchain and store in var
  BlockChain = NewBlockchain()

  // register router
  r := mux.NewRouter()
  r.HandleFunc("/", getBlockchain).Methods("GET")
  r.HandleFunc("/", writeBlock).Methods("POST")
  r.HandleFunc("/new", newBook).Methods("POST")

  // dump the state of the Blockchain to the console
  go func() {
    for _, block := range BlockChain.blocks {
      fmt.Printf("Prev. hash: %x\n", block.PrevHash)
      bytes, _ := json.MarshalIndent(block.Data, "", " ")
      fmt.Printf("Data: %v\n", string(bytes))
      fmt.Printf("Hash: %x\n", block.Hash)
      fmt.Println()
    }
  }()
  log.Println("Listening on port 3000")

  log.Fatal(http.ListenAndServe(":3000", r))
}
接下来我们只需要补全package和import信息
package main

import (
	"crypto/md5"
	"crypto/sha256"
	"encoding/hex"
	"encoding/json"
	"fmt"
	"io"
	"log"
	"net/http"
	"time"

	"github.com/gorilla/mux"
)
至此我们的程序就写好了。运行的我们的程序:(或者运行你自己的程序名)
go run simple-blockchain.go

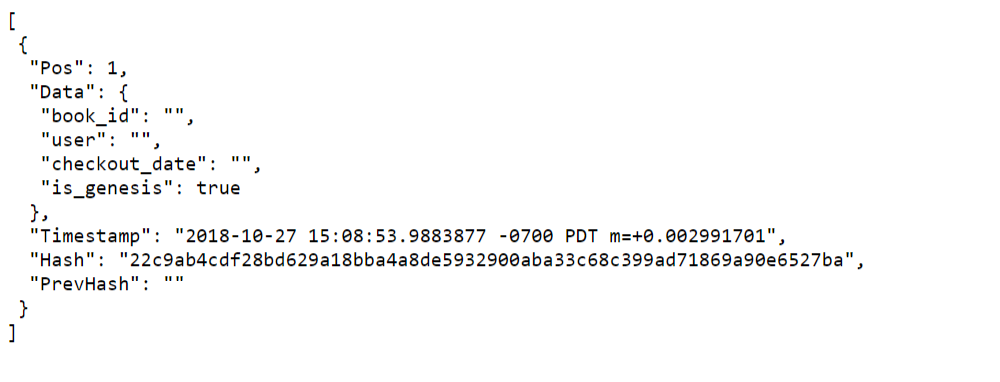
现在我们打开 localhost:3000,就能看到已经有一个创始块了

现在让我们添加一本新书。打开一个新的terminal,用cURL方式输入以下指令:
curl -X POST http://localhost:3000/new \
  -H "Content-Type: application/json" \
  -d '{"title": "Sample Book", "author":"James Bond",
"isbn":"909090","publish_date":"2018-08-26"}'
新书创建成功后,将会返回一个书目id,如下图:
有了id后,再发送类似下面的借阅信息(需要将刚才得到的id填入下面的”book_id”项):
curl -X POST http://localhost:3000 \
  -H "Content-Type: application/json" \
  -d '{"book_id": "fb98095972b27e378e06f526c66f63dc", "user": "James Liu",
"checkout_date":"2018-10-27"}'
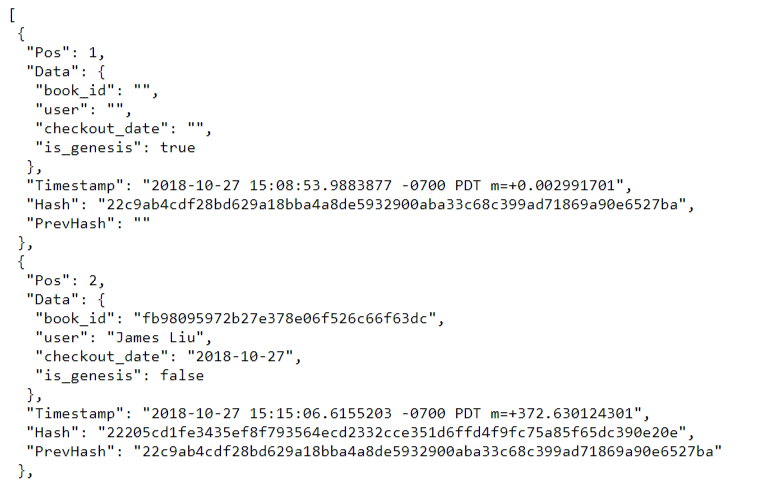
完成后刷新浏览器,可以看到”James Liu”的借阅信息已经成功添加到我们的区块链中了。
现在我们的区块链程序已经完成了。值得注意的是,与我们上面的程序相比,实际的区块链要复杂得多。上面的程序添加新块时非常容易,而实际上添加新块时则需要一些繁重的计算(Proof of Work)。本文旨在通过编写一个简单的程序帮大家更好地理解区块链以及其中必须的元素。
还有一篇值得一看的相似教程:Code your own blockchain in less than 200 lines of Go!
而且完成时我发现我们的代码也只有197行, 或许我们的标题也可以改为《用200行Go代码完成一个区块链》。Really Cool~
完整的代码可以在我的Github Repo中找到。
Written on October 27th, 2018 by sun
